People come into watercolor from so many ways. Some because they think it will be easy (!). Some because they are attracted to its luminosity. Some because of an experience in their past with watercolor — in school or with a parent or grandparent.
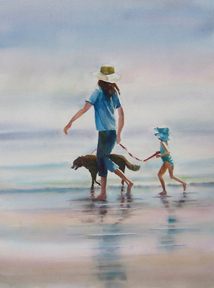
In Step – my daughter walking on a near-by beach with her dog and a little friend.
In art schools, watercolor tends to be treated lightly; not considered “real” painting, but a sketch medium.
True it has been used as the sketching medium of choice on trips — the 19th century European tour, by serious oil painters who didn’t want to lug their oils into the field, by Winslow Homer first on the battlefield ( It was this experience that led Homer to later seriously explore its possibilities). It is preferred over oils in schools because of its easy clean-up.
Building on Winslow Homer, on John Singer Sargent, John Marin and Burchfield, watercolor came into its own in 20th century America. One of my teachers, Rex Brandt, said he thought watercolor would become known as the “American Medium” — spontaneous, bright, fresh, open — recognizable characteristics of the American personality.
So here you are in watercolor… Are you exploring the wide parameters of the watercolor experience, or are you still “coloring” they way you used it in grade school?
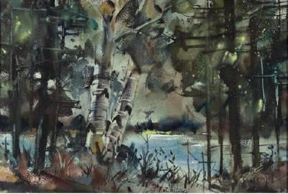
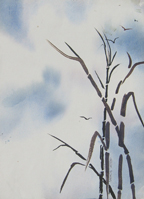
Edgar Whitney, White Birches
I was, until I discovered the way Edgar Whitney taught. He separated watercolor into 3 phases:
- In the first, wet-on-wet, he wet the whole sheet of paper, front and back after he had a sketch establishing his value plan and after having drawn a light contour drawing on the Arches watercolor paper.
- When it dried he established his major hard-edged forms, negative painting some, positive painting others.
- He tied it together with darks that punched out the major shapes, and decorative line work.
He taught, as many do, by talking and doing a demonstration of an entire painting. He was a showman; the time was enjoyable. Afterwards, the students were encouraged to whip out a similar painting in the 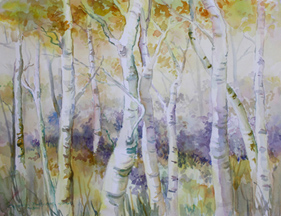 time remaining. A protégée of his, Eleanor Segur, taught on Mondays when I, with three elementary-aged children, could attend more easily. I took the same 10-week course 5 times over two-and a half years, — before we moved to Oregon.
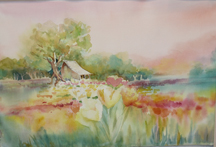
Aspens, Lavender and Gold, 2011 — still following Whitney’s steps
By that time I was making juried shows, selling well and had started to teach. Once west, I discovered Rex Brandt and studied with him in classes spread over 8 years. He became my artistic father — believing in me, teaching me much about painting and about teaching. Others who were important were Millard Sheets, Christopher Schink, Richard Nelson, Robert Wood, and all the courses of my Masters in Teaching in Art.
It was Richard Nelson who talked about process. After studying with him, I decided that the way of demo-ing a whole painting was ego-stroking and not in the bes interest of the students.
I started breaking the knowledge of watercolor into processes and decided there were 7. Instead of focusing on “today we are painting fog on the river” I changed to problems that make it possible for the student to know How To paint fog on the river, a fencepost in the snow or whatever it is that excites them.
The processes are: wet-on-wet start to Natty Dred
 wet on wet — wet the whole sheet front and back, or soak (after your drawing)
- develop the soft edges shapes
- develop the movement
- set up the whites by getting some color on everything else
- put colors down where you will want more than one color
- get out-of-focus texture — brambles and vines, leaf masses, salt, splatter
wet blending — wetting a small area and working wet-on-wet in it
- useful for any rounded object where color and light change as the move on the surface
 way of getting exciting color changes within a hue, such as the greens of trees
- maintains the hard edges that you can’t get on the first wet-on-wet
- with clean water can go from wet-blending to no color at all
glazing — any time you put a color down over a color that has already dried (see In Step, above)
- can be a second layer of wet-on-wet, wetting the whole sheet first
- can be a wet blending or a negative painting over the first wet-on-wet layer
 exciting luminous effects when you put one color down at a time, drying between — for example making skin tones with a yellow, then a red, then a blue — using more or less as the final color dictates
- the only way you can get fog, sunsets, water reflections
- gets tricky in how many times, which pigments you use; the under layers can start to wash up with overworking, wrong pigment choices
brush strokes
- a brush isn’t a pencil; if you are holding it like a pencil — you need help!
- try to say it in as few strokes as possible — if you use a #4 when a #10 brush can say it, it looks
 picky
picky - practice your strokes so that you get the gesture in your arm and shoulder
- the gesture is easier if you stand
- take a sumi-e course (see 01/12)
- Rex Brandt used to say: Dance into your painting. It shows.
color mixing
- do you know your colors? you need to know them as well as a musician knows his/her key signatures
- you need to decide (1st how much water is on the paper, is on my brush) then
- which hue (i.e.) green
- how light or dark — how much pigment
- how warm or cool – yellow green, or blue green
- how bright or dull
- and do all this immediately while the amount of water on the paper stays the same
- you need to learn to see the changes in hue and value on your subject and know how you make that happen with your color mixing choices
 since the white of the paper is what “sells” your subject most of the time, we watercolorists spend a lot of our time painting on the adjacent shape to make the lead shape stand out
- negative painting is tricky
- when you start, going along the edge of the lead shape, you load your brush with the most water; this feels wrong since you feel you are drawing
- as you move backwards, you use less and less water on the brush as well as less color
- finally the hue disappears with only clean water on the brush
- negative painting frees you from ever having to use masking solutions
- You need to know when to use one technique and when the other.
- You also need to learn how to come up with a design that projects what you wish to say and has no parts that aren’t contributing.
- You need to understand pigment quality and how it can enhance your color choices.
- You need to understand values, have a plan that establishes them to best take advantage of the white paper and tells you where to preserve the whites, since you can’t reclaim them once they are lost.
- In addition I think you need to look in your heart and paint what it is that moves you. You need to let go of the voices that tell you how you should paint, and find a way to believe in what you wish to do
negative painting – painting next to the object you wish to “show off”
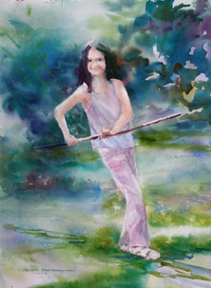
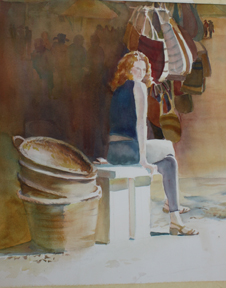
Chavalier Pali – note the negative painting of the out-of-focus foliage back from her arm.
That is the bunny slope of technique! You need to understand these techniques and master them before you can go to the top of the mountain. Would-be watercolorists who skip mastering the processes are doomed to lots of frustration. Their lack of technique will trip them again and again.. Hania Mornin
 Once you master the basics
Millard Sheets said it best: Learn the techniques so that not knowing them doesn’t get in your way. Learn the work of the masters — this is how you develop your aesthetic sense. Paint your passion!
 These are all difficult challenges.
What do you do today? Choose an area that needs improvement and make a choice that will help you to get better in this one area. Don’t try so hard to “make a painting.” Learn how to paint.
Happy painting!
Caroline
© 2012, Caroline Buchanan