 Just in time for the holidays — I am going to suggest two ways to make watercolor cards, You will end up with little watercolors that you can paste onto blank cards or you can cut them and send them as postcards — writing you message, addressing and stamping the backs. So start by working backwards: decide what size envelopes or post cards you wish to have.
The first way is slower and you get more complete paintings —
 Take a sheet of Arches 90 lb or 140 lb cold press, soak it and staple it to a board:
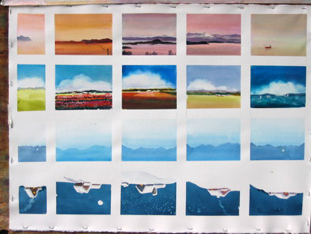
Once you have determined the size you wish the little paintings, use a ruler and mark off the squares, including room for your tape. Here is an example of the way a full sheet of the paper looks when are you are working with the tape. When you pull it off you have white borders to set off the paintings. The squares have been measured to fit 4 x 5 1/2 cards.
Now the fun part!
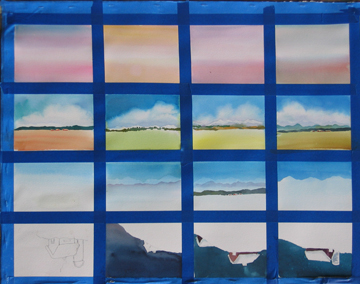 On the top row, I glazed graded washes across all 5 rectangles. The first glaze was red — all the way across. You can figure out which color to use second or third. Vary them. Be sure there is a light glow in the center.
- The next row was started wet-on-wet with a blue sky across the top, negative painting out white cloud shapes; white paper skipped and then yellow field stripe on the bottom ( except the water one). Then each rectangle was finished individually.
- The third row is mountain ranges started by a light blue glaze from the midline snow to the top.
 Next you can go lighter blue creating distant snow cover mountains or go darker for nearer hills. It is easy to make several at a time. Or you could finish them like
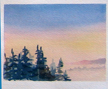
 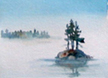 The little island painting.If you enjoy this and wish to learn more about glazing, you might be interested in taking the on-line glazing course listed in the classes section. It is a full exploration of how to glaze in watercolor.
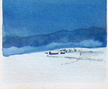
The one on these boards that goes the most quickly and you might wish to do the most – for the holidays is the bottom row. Note it is upside down.
- After you draw little cabins in the snow, made a great big puddle of thalo blue, thalo green, and
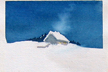 violet.
- Paint the sky with the board on a slant so you are painting the sky away from the land and
 buildings.
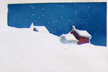
 - Sprinkle a little water or salt for stars.
- Add a little color at the horizon or some dark trees
- Run a damp brush through the sky for chimney smoke
- Color the sides of the buliding.
- Be sure to save the roofs as a white. You can shadow the edge toward the sides with a little grayfor
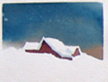
 a shadow.